

To be able to live in this era of music technology is absolutely astounding. It was only about 20 years ago where the studio norm was recording in gigantic and expensive studios with copious amounts of gear that was really unattainable for the average consumer. But as technology began to quickly advance and become increasingly affordable and available to consumers, we’re fortunate enough to be able to afford studio setups that can easily achieve anything you want within music. (Don’t let the ‘big guys’ fool you into thinking otherwise).
Don’t believe me? Look at Billie Eilish and Finneas, for example. They wrote and recorded smash hits within their bedroom with minimal gear.

Check out the interview here!
This is just one of the many examples of how powerful a home setup can be and how far it can take you within music production. Over the course of the past few years, I’ve been lucky enough to help many people setup their own recording spaces to record and release music of their own to the rest of the world. This post will be your basic purchase guide based upon recommendations both from experience and prior knowledge so you can get a more than efficient setup of your own to get you on your way to making beautiful music.
Also, forewarning: this is a long post. Take from it what you need.
Setup Overview
Before we begin, it’ll be easiest to see what you need once you know the chain of equipment and where each one serves a unique place. Below is a quick and simple diagram of a typical home recording setup.
Mic > Interface > Computer > DAW > Headphones/Monitors
Of course, setups can vary, but at the core of its foundation, this is the traditional and most succinct setup you can derive for recording.
Here’s another way you can visualize a similar setup.

With these blueprints in mind, let’s make a list of what your minimum needs are before getting into the details of each one.
Here’s your shopping list:
- Computer
- Digital Audio Workstation (DAW)
- Audio Interface
- Microphone(s)
- Headphones and/or monitors
- Cabling
If you have any of these, you’re already ahead of the game! You also may be thinking, “Well, who doesn’t have a computer?” and you’re right, most everyone does nowadays. However, whether or not your computer is efficient enough to run your DAW’s sessions is a different story, but we’ll tackle that later on. Lastly, this purchase guide assumes you have none of these items, so pick and choose as you see fit for your own situation!
First Things First. Your Computer.
To be completely honest, this may be the most expensive part of your setup, initially. Your computer is going to be your brain of the setup, so you really need it to outperform everything else. Otherwise, nothing else in your setup is going to work and/or work less efficiently.

Now, I’m not here to recommend any specific type of computer to you. Admittedly, I’m an absolute Apple geek (can you tell by the photo?), but that’s only because I’ve grown up basically using Apple and OSX the most. However, you should aim to purchase/build your computer with your OS in mind, according to how efficient/knowledgeable you are in said system. Don’t go purchasing a Mac because you’ve heard it’s “better” for creative work. In today’s day and age, it’s irrelevant except for specific software niche things and hardware peripherals. For example, if you want to work on Logic Pro X, then you’re basically required to get a Mac. Or, if you need a Thunderbolt 3 port, you will probably lean Apple specifically.
To keep things simple, here are some basic specifications I recommend for the average musician/producer. Also, remember this: you can look to see what the minimum requirements for software are before you purchase. If you already have an idea of what DAW software you might want to use, be sure to check out it’s minimum requirements and spec up from there. But if you just want a basic guide, here’s a quick spec recommendation list:
Recommended Minimums:
Processor: i7 or higher; or comparable processor, 2.3ghz or more.
Memory: 16GB or more (32GB preferred)
Storage: SSD 1TB or more*
Dedicated GPU is beneficial so you’re not using up allocated RAM
*If you’re recording directly onto an SSD hard drive like the Samsung T7 (via USB 3.0 or Thunderbolt 3 or USB-C), then you can negotiate this recommendation.
The benefits of getting/building a well spec’d computer pays dividends in the long run, so don’t underestimate the computer’s importance in your setup. However, if you have a computer that runs decently well already, you can use that until you feel the need to upgrade!
Your Choice of Digital Audio Workstation (or DAW)
Ahhh, yes. The great DAW discussion. We could go into an absolute rabbit-hole if we wanted, but let’s not and say we did. It’s not a fun one to go down and a lot of people get all fired up about it for no reason, really. Barring those few DAW elitists, I have a few recommendations from personal experience, but I highly recommend you trial some to see what your preferred workflow/stock needs are. This is list is in no specific order of preference.

Ableton Live 11

If you’re into EDM or producing in general, you’ve likely come across Ableton Live 11. I’m not going to lie, I never gave Ableton a chance until this past fall when I fell in LOVE with producing in there! It’s a DAW that lets you be creative quickly, comes with great stock synths, samples, and effects, and has incorporated key recording features (like track comping) in their newest release of Ableton 11. As with any DAW, there will be a learning curve to the software, and I’d argue, Ableton is a little less conventional than some of the other DAW’s on this list, but it’s workflow is second to none as a producer. It’s definitely worth your time to give it a test spin free for 90 days!
Cubase 11

I don’t tell many people this but once upon a time, I was a Cubase user! Although it’s been a while for myself, the software itself still remains a true competitor amongst other DAWs on the market today. A lot of the time, I see this DAW being used a ton in the metal/hard rock world for some reason, but that shouldn’t detour you if you’re in a different genre. This DAW features everything you need to record and produce music right out of the box, while touting true professional features.
Logic Pro X

One of my mainstays, Logic Pro X offers a ton of value for a very affordable price. Not only are the stock synths and others sounds quality, but the stock plugins are great too! Plus, there’s a ton of variety and options you can pick and choose from to use. Additionally, the workflow is great, the UI is attractive, and it’s just a great all-around option for whatever you want to do. Recording? It’s perfect for quick work and fast comping. Mixing? Very intuitive with a quick workflow and routing system. Producing? Stock sounds are great and it’s easy to be creative.
This is definitely one worth checking out if you’re on OSX. Please note: this is ONLY available for Apple users.
Pro Tools 2023

Ahhh, so we’ve reached Pro Tools. Before I begin, I don’t typically recommend Pro Tools for the beginning user. Pro Tools has too many quirks and is less user-friendly for producing, specifically. If you’re purely recording, mixing, and mastering, then this is one I’d recommend taking a look at as I think the Pro Tools workflow makes the most sense for these tasks. If you’re producing/composing, I’d steer clear and opt for a different selection on this list. It’s not that Pro Tools is necessarily bad for producing, but the workflow for producing is clunky, slow, counterintuitive and the stock sounds are complete garbage. Pro Tools also has weird bugs and glitches since Avid, Pro Tools’ parent company, doesn’t really give a shit about this “industry standard” any longer. So much so, there are basic features Pro Tools still has yet to incorporate that other DAWs have had for years.
Not only all of that, but Avid offers Pro Tools in subscriptions or perpetual licenses. For the standard version of Pro Tools, the perpetual license will set you back about $600 and then you lose free updates after a year. Where the subscription will set you back about $200 a year just to keep the “free” updates. Oh yeah, and by the way, you’re limited to 128 total tracks too in the standard version. It’s undoubtedly expensive and its value is questionable at best.
Why do I use it? Well, I’m used to it and I have a solid foundation for workflows in here. But that’s also after being a user since Pro Tools 8 (we’re on Pro Tools 2020.12, AKA, Pro Tools 13 now).
Take it for a test drive though! You may find you like it the best for your needs!
Presonus Studio One

Before I talk about Studio One, I’ve never used this software once. So, take what I say with caution. However, I will say, everything I’ve seen people talk about is mainly positive things with Studio One. From a glance, it looks like Studio One is like a hybrid between Pro Tools and Logic Pro X. People have boasted about having great stock plugins, intuitive and easy routing for busses (like automatic naming), etc. I’ve seen a lot of people primarily editing, mixing, and mastering with Studio One so I can’t speak for it’s producing workflow or it’s stock libraries of sounds. Like I said, however, people seem to like it a lot so it’s definitely worth giving it a go! I may have to myself!
REAPER

Obligatory REAPER mention here because of its price (or lack thereof). I, personally, do not care for REAPER at all, but it is a fully-fledged DAW that is only ~$60 with a never ending demo (but for real, do the right thing if you like it). For me, REAPER is not user friendly in the least bit. Its routing system is undeniably confusing and complex, which doesn’t make for efficient work. It might be more powerful than the average DAW in the long run, but nobody really needs that anyways. Also, REAPER’s user interface is also pretty bad looking and uninspiring, but you can change its theme to match other DAWs. Which I mean, at that point, you might as well use others DAWs then since REAPER doesn’t offer anything unique outside of its price. Not to mention, this DAW comes with some major elitist titles for some reason.
Interfaces
Next, let’s move to the interface conversation. I don’t know why, but interfaces are one of my favorite parts of a setup. There are so many different ways you can approach how you choose an interface for your desired setup. A quick couple of things to consider when purchasing an interface include: how many inputs/outputs you need (also known as I/O), what type of connectivity you need (USB, Thunderbolt 3, etc), and driver compatibility with your operating system. Now, instead of going down a complete rabbit-hole about interfaces, let’s just get to brass tax and go over the one’s I recommend the most, starting with the least expensive, and highlighting some important features of each unit.
Focusrite Scarlett 2i2

It wouldn’t be a complete list without mentioning the trusty Focusrite Scarlett 2i2. This interface could be one of the greatest budget-friendly interfaces ever built, which still retains its popularity amongst most home/project studio owners. On the newest 3rd Gen 2i2s, the preamps feature Focusrite’s proprietary ‘Air’ preamp functionality, a nice feature to have to play with. The interface’s preamp quality is pretty good, but maybe not as strong as the others on this list. As far as I know, there’s still not a virtual interface control through software, which means remote sessions and software-based control is not possible. Still though, a trusty and solid interface at a friendly price.
Focusrite Clarett 2Pre

I would be remiss if I didn’t at least mention the big brother x2 of the Scarlett line, the Clarett. The Clarett line by Focusrite is fantastic and boasts even better preamps than its Scarlett counterpart. They’re clean, reliable, and just sound good holistically. Sure, I may be a little biased as I own the mama of the Clarett line, the Clarett 8PreX. I definitely recommend this line with a ton of previous experience, but it’s a bit pricier than the Scarlett line. Definitely a worth look, however, if you want the Focusrite experience with superb quality.
Audient iD14

Another great option that is slightly more expensive is the Audient iD14. Audient is a fantastic company that builds great quality products. Their preamps, in particular, are known as being of high quality. Personally, I have no experience with this interface directly, but I own an Audient EVO 4 (like the little brother to this interface), and I absolutely love it for my mobile rig! However, unlike the EVO 4, I don’t believe this interface has a virtual software control counterpart, so remote session’s aren’t possible with this interface as well. This comes in at a slightly higher price than the Focusrite Scarlett 2i2, but the preamps alone may be worth the extra coin. You can also find the interface with different peripheral connectivity like USB-C as well as USB 2.0 (remember, the faster the connectivity peripheral, the lower the latency). Definitely check this one out if you have a little bit more to spend!

Audient EVO 4
I know I also mentioned the Audient EVO 4 so here’s a link to that! It’s perfect for my needs for a mobile rig that I can take anywhere. The preamps are clean and quiet and it comes with Audient’s EVO software where I can virtually control the interface without having to touch the interface at all. The software even integrates into Logic’s channel strip! The EVO also comes with a unique smart-gain control where you can have the hardware automatically set your input gain to a safe level, definitely the first of it’s kind. In addition, I’d recommend it for someone interested in having remote recording sessions since you could take control of the person’s computer and run a session over Zoom. Plus, it runs off of only USB power so no need for an AC adapter. I’d recommend this particular interface to someone who needs something small but quality. Truly a mobile machine!
Universal Audio Arrow/Apollo Solo
It was only a matter of time before we talked about Universal Audio. If you don’t know Universal Audio, they make some of the most highly sought after interfaces and preamps on the market. In addition, they also are most notably known for their other hardwares, such as the 1176 compressor. They are extremely high quality and one of the most popular choices one can pursue. So much so, I’m considering a UA audio interface to be my next interface venture sometime in the future. However, with that being said, you’re gonna pay the price for UA quality. Typically, UA prices these out of the consumer budget range and into the more semi-professional range, but if you have the budget, you may never need to upgrade your interface after an initial investment.

So, now I present the Universal Audio Arrow/Apollo Solo (I believe the Apollo Solo is correct now after a re-brand). This interface boasts the high quality Universal Audio preamps at a decently affordable price. In addition, their unison technology allows you to actually emulate famous preamps to get different tone colorations for your signal. Also, it’s completely Thunderbolt 3 powered as well, so there’s no need for an AC adapter.Lastly, you can also control your interface via their interface control software as well, and take advantage of their Luna DAW software. Unfortunately, however, you’ll need a Thunderbolt 3 connection or USB-C as they don’t make USB 2.0 or 3.0 versions of the interface at this moment. But, if you have this requirement, this might be one of the best investments you could make that’ll last you a very long time.
Universal Audio Apollo Twin Duo

Well, we might as well talk about the Apollo Twin Duo since we’re here. Another exceptional interface with all the great features above with even more added DSP processing for UA’s plugins. I believe another advantage to the Apollo is expansion capabilities for it’s I/O’s as well. My longtime good friend recently picked this interface up and he has absolutely LOVED it. Also, the interface also comes in a USB 3.0 configuration, as well as a Thunderbolt 3 one so you can get the connectivity you need.
Microphones
Microphones are another topic we can get lost on real quick. I’m going to keep it simple and recommend some friendly but great sounding microphones that’ll get you from point A to point B quickly.
Also, it’s important to establish the differences between a dynamic and condenser microphone (we’ll leave ribbons out of this for now). Here’s a video summarizing the topic!
Audio-Technica AT-2020

Chances are you’ve either have heard or have probably seen this mic around, whether it be in other project studios or your favorite streamer, etc. The Audio-Technica AT-2020 is one of the most popular entry-level choices for a condenser microphone. It sounds pretty good and gets you a relatively clean sounding vocal right off the bat. I will say though, however, you can pay a penalty in prevailing harshness sometimes when using this guy. So, while it’s clean and sheen sounding, sometimes the hype in the upper-mid range gets the best of it, making it difficult to work with sometimes especially with sibilance. Still, a great option at an affordable price. And by the way, please don’t buy the USB one.
Rode NT1-A

Funny enough, I actually had a few of my really good friends of mine switch from an Audio-Technica AT-2020 to a Rode NT1-A last year and the quality in their recordings improved drastically, in my opinion. The Rode NT1-A is another clean and sheen sounding mics at an affordable budget, but comes with less harshness in the upper-mids. This is another popular entry-level condenser mic for many people as it comes with a pop filter and shock mount. It’s a whole bundle with needed accessories bundled into an affordable package. If I had to, I’d recommend the Rode over the Audio-Technica undoubtedly, but it all depends on what you’re looking for yourself and what works best with your voice.
Aston Origin
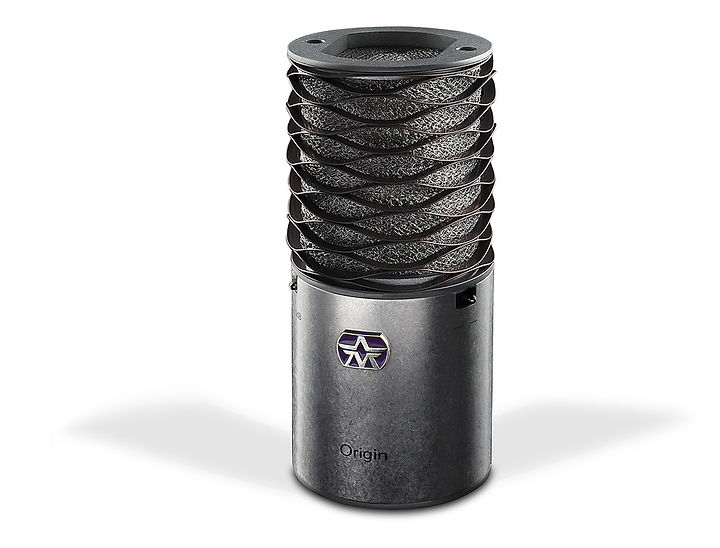
Really, anything Aston has made has been superb quality without breaking the bank! I use this mic extensively and find that it works really well on all types of voices, along with acoustic guitars. While the mic itself might look a little bizarre itself, the quality of the all-metal chassis build and wired mesh pop filter screams well-crafted to me. I cannot recommend this mic enough as it’s price point isn’t terrible either. While still a qualified entry-level condenser mic, it’ll set you back about $300 now (I got mine for about $220 when it first came out). However, it’s highly worth every penny.
AKG C214

This mics is another common one you’ll see lying around a home studio. Although I don’t have one myself, I have come across it a few times and have generally been pleased with its results. However, the sibilance on this mic does become a bit too much on the right person, so that’s a slight critic of this mic. Other than that, it’s rather versatile as it can be used on vocals, electric guitars cabs/amps, acoustic guitars, etc. Not a terrible mic to look at if you need the versatility!
Avantone CV-12

Long coined as the “Taylor Swift mic,” the Avantone CV-12 is a wonderfully warm and sheen sounding microphone. It actually is Avantone’s take on the AKG C12, a widely iconic microphone with an expensive price tag. Its lows are warm and cushy, while its details in the high don’t get overly harsh and are silky smooth. I’ve been eyeing this one myself for a while, but still have yet to pull the trigger. Plus, this mic has multiple polar patterns and is tubed, so if you’re looking for those features or getting into tube mics, this would be the perfect first step. Plus, who could hate that nice red look to the mic?!
Slate VMS ML-1

Now, we’re getting into some really cool territory. The Slate Digital VMS ML-1 is a modeling microphone that uses Slate’s proprietary technology to virtually model and emulate different sounding microphones through a single mic. What does that mean? Well, it means that you can have multiple mics within one microphone to pick and choose from based on the accompanying software. There are a few arguments investigating whether or not the emulations sound true to the original. But even if the mic gets about 90% of the way there, I believe it’s worth it’s price tag. This is definitely more advanced for the entry-level user, but offers a lot for its package. This mic should definitely get you excited for the future of virtual miking as it will only progress further from here.
Shure SM7B

Our first look at a dynamic microphone on this list: the Shure SM7B. Now, this mic won’t be for everybody. It’s rather dark and requires a TON of gain to power. So much so, I’d actually recommend this accessory if you plan on going down this path. But that’s not to say it’s a bad mic. Actually, it’s a rather great sounding microphone. In fact, so good that Michael Jackson used it to record Thriller. You’ve heard of that album? Yeah, it’s a great mic to say the least. It’s also extremely popular in the broadcast world as well, which you may have seen it floating around in. Lastly, the mic is also versatile in the sense it’s also used to capture guitar cabinets and sometimes kick drums. Worth a look if you’re looking for a dynamic mic!
Shure SM58

Finally, the trusty SM58. I know you’ve seen this mic as it’s basically used on every stage ever. This thing is an absolute indestructible workhorse. I’m pretty sure too, if you tried to nuke this mic, it’d survive and work just fine. Does it sound fantastic? Not particularly, but it certainly gets the job done! It’s no frills also means to extra distractions. You just get right to work. Notably, this is a dynamic microphone option too and doesn’t require as much gain as the SM7B, aforementioned. You can find these for like $75 used too, so if you need a cheap and easy option, this might be what you’re looking for.
Headphones
Another fun talk is the headphones conversation. With headphones, you can deviate from the status quo and use whatever you want, really. However, there are a few fan favorites out there that I’d recommend if you want something widely recognized. It’s also crucial to point out that you should evaluate whether or not you want to work primarily on monitors or headphones at first. I’d recommend headphones since you can use them for tracking without any bleed, whereas monitors would cause so much bleed into the mic and it’d be hard to hear yourself recording. I definitely recommend having both in the long run, but starting out, just focus on headphones IMO.
Before you proceed, you may want to dive into what open-back vs closed-back headphones are to find what you’re looking for. And do note, you can go to your local Guitar Center or music shop and likely listen to a few of these before purchasing!
Audio-Technica ATH-M50x Closed-Back Headphones
These may be my most favorite headphones ever. Not only do these headphones sound great, but they also look good and feel comfortable too. I use these all the time for tracking in the studio and I’m able to get a pretty good headphone mix off rip. These are also pretty affordable and will last you forever. Definitely check these out if you get a chance! You won’t regret them.
Sennheiser HD 280 Pro Closed-Back Headphones
Another solid and affordable option are the Sennheiser HD 280 Pros. Although not as pretty sounding as the Audio-Tehcnica’s, Sennheiser makes great quality products that are structurally sound which will last through the wear and tear of the gear lifecycle. I use these for my vocal booth and generally everyone likes them. These headphones would actually be the ones I’d choose to mix on since they’re so mid-ranged focused. For the price, you can’t beat them.
Sony MDR-7506 Closed-Back Headphones
Finally, we have the classic Sony MDR-7506 Closed-Back headphones. Although not my favorite ever, these headphones got the job done for years for my studio, and in fact, I still use my 15 year old pair. They don’t sound fantastic as the high-end is boosted to no end, while the low-end is non-existent, but they do work in a pinch. Now, mine are definitely open-back headphones so I’m not sure when Sony made the switch to closed-back, so I’m sure the bass response is a bit better now. However, for the price, they are worth the money.
Monitors
Like I said, we can get into the monitor talk a bit later as there is an awful lot to consider when choosing your goto monitors. As previously mentioned, I recommend you secure a nice pair of headphones first and foremost then worry about monitors later. Therefore, I’ll make a dedicated monitor post for the entry-level home studio owner in the near future covering some popular choices and important considerations before purchasing.
Accessories/Cables
Don’t forget about your cables and other accessories like pop filters and shock mounts! I don’t have any immediate suggestions about cabling but some would argue for you to get the very best available. However, as long as you have cables that work well and don’t have any issues, you’ll be just fine. You can also use this link to help you in determining what your needs are.
Here’s a quick shopping list for accessories. Again, these will vary from person to person.
- Pop Filter
- Shock Mount
- Mic Stand
- XLR Cable(s)
- Reflection Filter*
- External Hard Drive (Preferably SSD)*
*Optional
Oh, remember that you’ll need a mic stand as well! Again, many options out there, but I generally believe that you’ll hate the super super cheap ones. Maybe make a little bit of extra room in your budget, if you can, and get higher quality one’s that won’t feel like they’re always on the verge or breaking or ones that constantly tilt.
As for pop-filters, you’re definitely doing to want at least one of these for your mic, especially if you’re using a condenser. You can shop around and find one that best fits your budget, but anything by Stedman is usually a safe bet.
For shock mounts, you can get away with not having one of these for your mics and opting for just using the mic clip. However, it’s generally good practice to use a mount to prevent any bumps or rattles while you’re recording. What mount you get also depends on your make and model of microphone so I can’t really suggest a specific one to fit your setup here. There are also universal mounts available as well if you need.
An interesting topic is the debate of necessity for vocal shields and isolators. I’ve never had great luck with these, but others swear by them. We can get into the technicalities later, but it’s worth a shot especially if your room is not treated well. A few that come to mind are the Aston Halo, Kaotica Eyeball, and sE Electronics Reflexion Filter.
Lastly, you should also consider purchasing an external hard drive to work off of. Not only is it portable so you can take it from studio to studio, but you can also work off of it, allocating dedicated write speeds to the hard drive, while only reading from your computers drive. This makes recording more efficient and also lessens the load on your computer’s processing. I look at it like this: the computer processes plugins/other software, while the hard drive writes and reads the session data. For this, check out the Samsung T7! I have two of them and love it!
A Word on Plugins
The world of plugins is fun and exciting, but can also be an absolute money hole if you let it become one. Contrary to belief, you don’t need any third-party plugins outside of the one’s that come with your DAW. Now, sure, some of these other plugins may have better features and fill in gaps where your DAW lacks utility. Generally, I recommend you get the plugins that may fill a gap in your toolbox. For example, if you use Pro Tools, you’ll notice you won’t have any pitch correction plugins, so then you may want to look at Waves Real-Time Tune or Antares Autotune to fill in the gap. It all really depends on what your immediate needs are and getting plugins on sale, with an academic discount, or from a plugin dealer (I recommend www.audiodeluxe.com) to save yourself some money.
Some Things to Stay Away From
Yes, there are some brands and products to generally stay away from. I’ll quickly go over a few of these but won’t dive super in-depth as it’s all relevant to your own preferences anyways. However, I’ve never had excellent experiences with some of these products.
Anything Behringer… Ever.
I swear, anything Behringer I’ve ever used was absolute garbage. I remember one time, I was helping a good friend of mine setup his Behringer interface and the driver’s weren’t recognizing the device on his computer. We got so frustrated we actually called up their technical support and they couldn’t even help us. Not only that, but the customer service rep sounded like Jeff Foxworthy and mid-call started eating potato chips on speaker phone… So, yeah. The guy ended up blaming my friend’s computer as being the culprit, so my friend sent back the interface and got a Focusrite Scarlett instead, and then everything worked fine. Go figure! So, please, the Behringer price tag may be nice, but their products aren’t good.
PreSonus is beginning to toe-the-line…
I know I mentioned using PreSonus Studio One earlier in the article as a DAW. As a DAW, PreSonus has done a great job nailing this piece of software, however, with their equipment, the more consumer-friendly options definitely feel/sound… cheap, in my opinion. I’d recommend avoiding the baseline PreSonus stuff and splurging a bit more upfront in-exchange for a more worthwhile investment.
Blue Bluebird SL Condenser Microphone
I cannot NOT recommend this mic enough. I’ve never heard this mic used well with anything. Seriously, I cannot stand this microphone. I’ve used it a couple of times myself and it just is harsh in the upper-mids, but oddly dark at the same time. The reason I wanted to put this in the article is because this is a typically recommended entry-level mic. But it honestly shouldn’t be. Save your time and money.
Last Minute Considerations
Before you go purchasing anything for your setup, be sure to check out websites like Reverb.com, where you can find used gear at a massively discounted price. Generally, everything is safe to get used as long as it’s in decent conditions (maybe with the exceptions of monitors). Additionally, you can also find products that are ‘As is’ from places like Guitar Center and Sweetwater. These are typically showroom products that have been on display but they sell them at a cheaper price because of the showroom wear and tear, which is generally pretty tame.
Possible Setups
Here are some of the possible combinations using the products in this post. None of these will include the price of a computer as there are so many different possible combinations for this, it would be ludicrous to try to incorporate all of them. Same with necessary accessories. Keep in mind too, most of these items can be bought used so you can save some cash on the backend! It just might take a bit longer to piece things together. Finally, remember that what’s included on this list isn’t the end all for audio products, merely just suggestions based on prior experience.
SETUP #1
Digital Audio Workstation: REAPER
Interface: Focusrite Scarlett 2i2
Microphone: Audio-Technica AT-2020
Headphones: Sennheiser HD 280 Pros
Total Cost: ~$370
SETUP #2
Digital Audio Workstation: Ableton Live 11
Interface: Audient iD14
Microphone: Aston Origin
Headphones: Audio-Technica ATH-M50X
Total Cost: ~$800
SETUP #3
Digital Audio Workstation: Logic Pro X
Interface: UAD Apollo Twin Duo
Microphone: Avantone CV-12
Headphones: Audio-Technica ATH-M50X
Total Cost: ~$1750
A Final Word
This article isn’t an end-all be-all scenario! There is plenty of other options available in the music marketplace should one of these things not be what you’re looking for. With whatever you decide to go with or do, if you ever need any help or advice, always feel free to reach out to us for some guidance.
Follow us on social media!
Facebook: @studio222recording
Twitter: @MixedbyMcLeod
Instagram: @studio222recording
If you’re looking to start a new podcast, be sure to check out the Music Makers Cookbook where we talk in-detail about building a career in music, music entrepreneurship, and much much more!

